How To Arrange Chords
Audiences focus on the melody, but a great chord progression is the heart of any hit song. If you want to start crafting your own music, knowing how to arrange chords is an essential skill.
DECEMBER 11TH, 2020
While audiences might focus on the melody, a great chord progression is the heart of any hit song. Harmony drives the rhythm and groove of your song, and sets the mood for your listeners. If you want to start crafting your own music, knowing how to arrange chords is an essential skill.
In this article, we’ll show you how to arrange chords together, and give you a few tools to get started arranging chords on your own. Whether you’ve never written a song before or you arrange one every day, these tips are sure to help you improve your craft.
Picking a Key
The first step in arranging chords is to choose which key you want your song to be in. A key is a set of related chords which sound good when played together; keeping all of your chords in the same key is an easy way to make your song sound good from start to finish.
If you’re writing a song from scratch, you’ll also need to decide whether you want to play in a major or minor key. Major keys tend to sound happier, with more energy and an upbeat feel. Minor keys, on the other hand, are great for sad, darker sounds.
If you’re just starting out with a song, it’s a good idea to pick a common key, like G major, C major, or A minor. These keys are very popular in rock, pop, blues, and country, so you’ll already have a good feel for how they sound. As you get your bearings learning chords, you can always branch out to more unique keys.
Creating Tension
Tension is what makes a song interesting, and gives your tunes forward momentum throughout the chord progression. It’s important to generate and release tension if you want to keep your listeners engaged throughout an entire song.
Learning how to build this tension with your progressions is a crucial part of arranging chords. Thankfully, you can still generate tension with your arrangements even if you only use chords from one key.
Certain chords in a key -- like the dominant “V” chord and subdominant “IV” chord -- generate a strong “pull” towards the tonic chord. These chords are often used to set up a resolution to the tonic chord of a given key, or set the stage for a switch to another part of the song.
If you want to create some tension in your songs, just add one of these chords right before the tonic chord. For example, if you’re writing a song in G major, you could arrange a D major chord right before resolving to a G major chord. This will lend your song some momentum with a pleasing resolution to wrap your arrangement up.
Adding Some Twists
While creating basic chord progressions is a great way to get started arranging chords, over time most guitarists grow out of the first few progressions they learn. If you want to express new moods and textures with your songs, it’s a good idea to add some unique touches to your arrangements. Try some of these twists to break out of the box.
One famous twist is moving from the IV (major four) directly to the iv (minor four) chord. The Beatles use this to great effect on many of their songs, because it provides a bit of extra tension to what is otherwise a very simple chord arrangement. It’s a great way to delay the resolution and make your arrangement sound a bit more mysterious.
Aside from adding easy guitar chords to your arrangements, you can also try altering the chords you use. Adding extensions and extra notes to your chords -- like turning a G chord into a G7, or using a Dm9 instead of a standard Dm -- will help you arrange more interesting progressions without trying to fit more and more chords into a track.
Of course, if your chord progressions are feeling a bit too simple, you might just need a great bassline or guitar riff to spice things up. With our Virtual Bassist, you can input the root notes of each chord in your progression, and it will create a dynamic bassline completely on its own. It’s a great way to save time and get killer basslines to pin down your grooves.
Arranging Chords Digitally
While creating chord progressions is fun, you won’t be able to share your songs without arranging your chords online. Once you’ve laid down some basic guitar chords, you can arrange the chords in a Digital Audio Workstation (DAW) to finish your tracks and share them with the world.
You can use a MIDI controller to input your chords directly into your DAW. However, this basic approach might create lackluster progressions, or stilted, simple chords that don’t grab a listener’s attention.
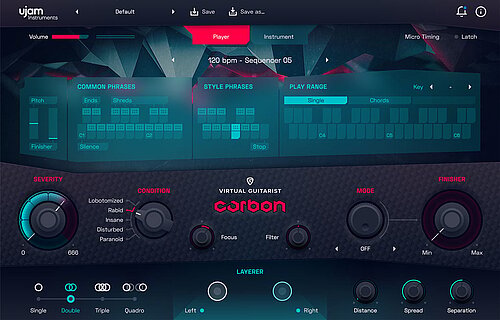
Plugins like UJAM’s Virtual Guitarist series help you translate your chords onto a DAW and create more interesting, lifelike progressions as well.
Virtual Guitarist plugins create chords out of just one or two notes, so even if you don’t have a full progression worked out you can still get a great-sounding song. There are five different voicings, ranging from acoustic and classical guitars to funk, rock, and futuristic guitar sounds.
To use Virtual Guitarist plugins, all you need is a MIDI controller and DAW. Using your MIDI controller, put in the root notes of each chord and your Virtual Guitarist will fill out the track.
Each key is matched to a phrase in a given style, so you can trigger new riffs just by pressing one button. This is perfect for adding color and flair to a simple progression, and it makes it easy for any musician to add killer guitar riffs.
Each VG plugin also offers tools to shape the tone of your chord arrangements, with different voicings just a click away. These let you pick a hard-edged sound or a smoother, light touch to suit the mood of your song. No matter what vibe you’re going for, Virtual Guitarist plugins can nail the style and tone.
Conclusion
Learning how to arrange chords can take your songs from ho-hum to hits. While it takes some practice, with the tips we’ve provided here you’re sure to improve. Having a little help never hurts, either -- so make sure to check out our virtual musician tools to take your arrangements to the next level!
About the author
Ellie Mckinsey is a staff writer for Know Your Instrument and writes regularly about playing and learning the guitar. She has been teaching the guitar for the past ten years and loves to come up with new and creative approaches to learning. When not playing, Ellie likes to go traveling and visit new and less visited places.

Stay up to date
Sign up and we’ll send you an e-mail with product news and helpful stuff every now and then. You may unsubscribe at any time.
Defy Limits
We develop software solutions that enable people to create, consume and interact with music.