Basics of Sound Design with Synths
Forget fancy plugins — here’s how to create better, more original sounds with options you can find in nearly any synth available.
MARCH 27TH, 2022
By the end of this article you will have a good idea of how to sound design using the built-in options found in nearly every synth.
Sound design is a complex topic with many nuances, but if you know the foundations rather than just a few cool tricks, you’ll quickly become a more versatile sound designer than the vast majority of producers!
The fundamentals: waveform vs. phase
It’s important to note that most forms of synthesis operate in two domains simultaneously: waveforms (the physical shape of the wave taken over time) and phase (the position in time where the waveform is playing). Manipulating these gives you the ability to create a variety of sounds — waveforms can be bent, pulse width modulated (shortening the waveform and adding empty space to make it thinner and crunchier) and tons of other effects, depending on your chosen synth.
Phase is a bit more limited to play with, but it shines when you “lock” it rather than randomizing it on note start, as is the standard for nearly everything synth. Distorting phase (randomizing it using noise) is a great way to add grit and avoids many of the drawbacks of “regular” distortion, but it’s unsuitable in most cases so you’ll want to proceed with caution.
A single frequency with no harmonics is known as a sine wave. Manipulating a waveform typically introduces harmonics, or frequencies above the fundamental note you play. This allows you to build complex sounds from simple ones, but be wary of heavily processing more complex waveforms as they quickly become messy. Introducing all harmonics often brings sounds closer to a sawtooth shape, which is the building block of supersaws; introducing only odd harmonics and avoiding even ones creates square waves, which have a hollow sound that can be found in nearly all 8-bit retro video game music. Triangle waves have a sawtooth-like profile but with much quieter harmonics.
That’s it for the building blocks — they’re a little dry, but now it’s time for the fun stuff!
Frequency, amplitude and time-based effects
Frequency modulation (FM) allows you to influence the speed of a waveform’s playback with another waveform, creating entirely new sounds. Using complex waveforms for this often resembles noise, so using simple waves like the ones above will help greatly. You may be disappointed with the results at first, though stretching out and manipulating waveforms will give you much more interesting results! Amplitude modulation (AM) is another fundamental tool for transforming basic sounds into something more complex, though it’s more limited to metallic effects and isn’t a perfect fit for most sounds.
Another option you can and should use frequently is comb filtering: this creates a delayed copy of the sound you route through it, and a few milliseconds of delay creates dramatic metallic or blurring effects depending on the settings and type of comb filter you use. Delay-based effects are subtractive in nature, meaning they reduce the overall harmonic profile; in some ways, this is the opposite of distortion, offering you to create more advanced sounds by cutting back rather than adding. That’s why comb filtering won’t do much to basic waveforms — this is one case where it pays to start with a more complex sound so you have plenty to cut.
Combined with distortion, especially in multiple stages, you can build an incredible range of timbres! Too much comb filtering can “smear” your sound and weaken it considerably, however, as manipulating timing is similar to playing with phase, which directly impacts sonic stability. Go crazy, of course — just listen back to make sure the clarity of what you create doesn’t suffer!
Movement: the cure for boring sounds
One of the greatest sound design sins is creating static sounds; the easiest way to combat this is to create movement, or the impression of motion within the sound (this is a core design principle behind UJAM’s Finisher multi-effects!). Manually modulating synth parameters via DAW automation is virtually a necessity to achieve this — while you can manipulate any settings you choose, there are certain options that are eternally useful.
Filter modulation is one of the most common options and is a core component of many subgenres of EDM, but there’s an alternative that is used nowhere near as often: EQ modulation, where you take an EQ boost or cut and automate it within your DAW. One of the best parts of this is that you can automate a variety of boosts and cuts on a single EQ, creating a ton of complexity with a single effect. This isn’t extremely common, but it is incredibly versatile in virtually any style of EDM! It takes a bit of practice to understand how to create tasteful modulation, but with time, this can give you an incredible edge as a producer!
Modulating settings on distortion effects can also yield great results, especially if you’re using waveshaping distortion (essentially re-mapping your existing sound via a matrix) — this way, you can change the “shape” of the distortion to introduce different types of harmonics in real time, almost changing it from within. This is a fantastic way to make the sound feel more alive, giving it radically different expressions and morphing between them (this is more effective on basses than it is on chords, as distorting harmonies or chords creates extremely muddy spectra; the cleaner the initial sound, the more mileage you’ll discover here).
Wrapping up
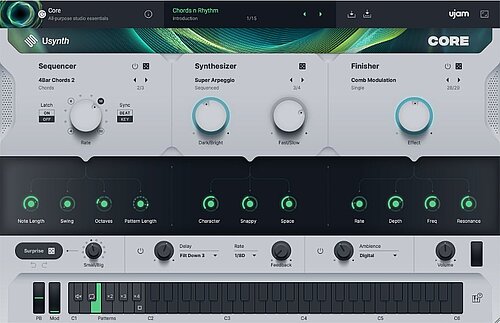
This is only the beginning of the incredible range of sound design opportunities available to you. Notice we didn’t go into FFTs, vocoding, spectral masking or a range of more advanced sound design possibilities; while there are far more options available to you, it pays to know the essentials you’ll find in nearly every synth. This way, you’re able to start with the highest quality and use cool tricks to support your efforts, rather than compensating for an unstable foundation. Of course, if you want a synth that keeps things simple and gives you the most mileage for the least work, Usynth Core is your best bet — with a library of essential presets and none of the manual work normally needed to get a professional sound!
Play with the essentials first, finding new and even absurd ways to use them; this is how you become a truly great sound designer. This is especially true if you’re into bass music, because almost every sound you hear from your favorite producers is likely due to a combination of the foundations we’ve outlined above. The best sound designers aren’t defined by using more advanced tools, but by the small decisions they make early on in a song that add up to something incredible.
Do the same, and you’re well on your way to becoming a great sound designer!
About the Author
Harry Lodes is a copywriter, marketing consultant and content writer for audio and ecommerce brands. He lives in the Philadelphia area, releasing Eastern/Western hybrid EDM under the artist name KAIRI hearkening back to his roots in Berklee College of Music.
Stay up to date
Sign up and we’ll send you an e-mail with product news and helpful stuff every now and then. You may unsubscribe at any time.
Defy Limits
We develop software solutions that enable people to create, consume and interact with music.