How to Choose an Effect for Music Production
Never worry about lifeless sounds or staring at empty effect chains again, and how to know exactly what type of effect to use in virtually any situation.
OCTOBER 25TH, 2020
Learning fancy production techniques is great, but getting solid on the basics will help you to improve much faster. This guide should nicely fill in your audio effect knowledge, or at least serve as a useful refresher. And once you fully understand these concepts, you’ll find that the entire production process will become far more seamless. Let’s start off by articulating the difference between the two types of effect processors you’ll come across.
What’s the difference between virtual and real effects?
Many virtual effects, or VSTs, were designed to model their analog equivalents--EQs, compressors, reverbs, delays, etc. A lot of engineering effort has been applied to making these sound better and more realistic, but there are also plenty of effect types that simply aren’t possible to achieve with analog gear.
For example, granular synthesis takes pieces of digital audio, grinds them up and mashes them together for an incredibly rich, atmospheric effect; there is no ‘real’ equivalent to this. There are plenty of other examples like FFT effects and creating wavetables, and describing digital-only effects can get complicated very quickly. Suffice it to say, virtual effects allow you to add and combine effects you’d never be able to achieve in a purely analog environment.
Another fun aspect of them is that you can chain virtual effects together very easily and even duplicate the same effect in series, modifying your sound dramatically in seconds. With real analog units, using two of the same effect requires you to record the original and then run that audio through your gear again, or buy a second unit at possibly thousands of dollars! In that regard, virtual effects can’t be beaten.
How to choose an audio effect
We went into a brief description of some common audio effects in music production in the article Shaping the Sound of Your Guitar--now let’s go into concrete examples of how to use them. Once you have an instrument or audio recording loaded in your session, you know you want it to sound different...but you may not be clear on exactly what sound you want to create or how to bring it to life. With that in mind, here’s the unofficial, non-scientific guide to creating the sound you want:
- If you want to add bite, grunge, energy, or ‘meltiness,’ distortion is your best bet
- For cleaner, more precise sounds, reach for EQ (specifically subtractive EQ)
- If it sounds too dry or close, add reverb or a light un-timed delay (also called ‘slapback’)
- If you want it to take up more space, use additive EQ for low-mid frequencies or a quick, rhythmic delay
- To create electrical or metallic sounds, add a flanger or phaser
- If the volume or dynamics are all over the place, slap on a compressor to bring them back under control
The reality of music production is of course much more nuanced, but the above list should provide a general guide for how to chisel away at writer’s block. When in doubt, keep moving; making poor production decisions is far more productive than making no decisions at all. The more decisions you make (regardless of whether they’re in excellent taste), the more opportunities you have to course correct and improve your abilities.
Who do you want to sound like?
We can talk about originality until the end of time, but chances are that sometimes you want to create a track that sounds exactly like it was written by one of your musical idols. This, incidentally, is also one of the best ways to learn music production. By attempting to recreate or emulate sounds created by your favorite artists, you’re forced to look at your own music with a critical eye while still maintaining a reference point.
First, decide what artist you want to emulate, and then narrow it down to a single song. Listen to it all the way through a couple times, even if you know it by heart already. Otherwise, your brain will miss things or insert sounds that aren’t in the original (everyone does this unintentionally, even the pros!).
Pick out a single sound you’d like to recreate. If it’s a synth, you essentially have to operate from scratch; if it’s an acoustic instrument outside of the excellent guitar, bass and drums UJAM creates (and depending on your budget), 8dio and CineSamples produce all sorts of detailed instrumental libraries. Although we might have something of interest coming up...stay tuned.
As best you can, try to figure out which effects the producer used on the sound you’ve isolated. Don’t worry about getting this perfect, especially since some producers’ effect chains exceed 20 plugins in some cases because they’re aiming to create something very specific and detailed. Start by choosing adjectives you feel describe the sound and using your own effects to create something that fits the same sonic profile (adjectives like ‘dense,’ ‘floaty,’ ‘dark,’ and ‘gritty’). You will improve much faster if you start developing your own vocabulary to describe sounds--you’ll think more clearly and produce music a lot faster.
Isolate different sounds one by one and repeat the above process until you have enough material to be happy--just remember not to copy anyone’s sounds too closely in your final releases!
What is a multi effect plugin?
Some plugins combine multiple effects into one: filters, distortion, reverb, etc. This allows you to work more efficiently and saves your computer some processing power, and makes it easier to automate effect parameters in your DAW session. You can accomplish a lot more with a single plugin, and you get multiple effects from the same manufacturer all at once. A win-win all around!
Multi effects often contain specific effects that sound raw or incomplete on their own, and having an EQ, filter, reverb and other units chained together gives you more creative control and allows you to achieve fuller sounds in much less time. Most will allow you to switch the order of the effects, which is super important--a series of effects can sound radically different just by moving an effect one place earlier or later in the chain. For example, distorting the signal before a filter may have a gentle and warm quality, while placing the distortion after the filter could give your audio some sharp teeth. Try switching your effect order every now and then--chances are you’ll discover some sounds you didn’t know you could make.
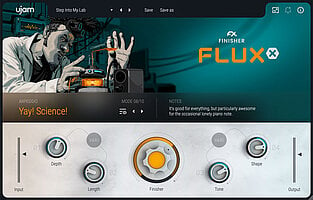
Introducing Finisher FLUXX
If you can’t get enough of experimenting with new sounds and bringing your sound design to life, check out UJAM’s newly released Finisher FLUXX! It’s especially fun if you want to play with tools like granular processing and step sequencing. Don’t worry if you’re not familiar with those yet--all you have to know for now is that FLUXX contains 50 individual mini-effects called Modes that each do something a little different, which you can use to create atmospheric, mechanical, glitchy, and even disintegrating sounds to your heart’s content.
Conventional multi effects might provide 5 or so effects (filter, distortion, delay, compressor, reverb, etc.), but 50 is unheard of--we wanted to make sure you can create virtually any sound you want without buying 10 separate multi effects. Try it here and see what wicked experiments you can create!


Stay up to date
Sign up and we’ll send you an e-mail with product news and helpful stuff every now and then. You may unsubscribe at any time.
Defy Limits
We develop software solutions that enable people to create, consume and interact with music.